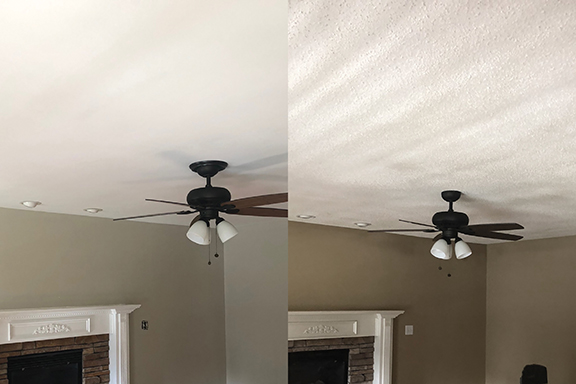
Popcorn Ceilings Are Bad

Easy Tips to Make Your House More Marketable
By: Nicole Brungardt, Senior Account Manager, Property Masters
Acoustic ceilings, or better known as “popcorn” ceilings, were first introduced in the 1930’s—can you guess why?
The aggressive texture was easier and faster to apply, they were more cost effective, and they hid imperfections and muffled sound. Who cannot get behind that? Millennials—and I will tell you why.
NOT INSTA-WORTHY
First impressions are everything when looking at homes to purchase. When buyers first set out on the journey of purchasing a property, they do a Google search before hitting the streets. This means you better have great pictures of the house you worked so diligently on to get market ready!
Behind all good photos is great lighting! Popcorn ceilings will sabotage your asset’s online presence. The uneven texture of the popcorn causes light to bounce and create harsh shadows. This is especially true if a room has recessed or flushed lighting which can translate very poorly in a photo and could ultimately deter a buyer from visiting the home in person.
AGE AND REPAIRS
Roofs leak and pipes burst! This is just something that comes with owning a home. Depending on the age of the popcorn ceiling and who initially applied it, it is extremely difficult to match the consistency and color after water damage. Imperfections will stick out like a sore thumb in photos and in person. Over time, the ceiling will begin to deteriorate and start flaking off. The flakes consist of styrofoam, cardboard, and vermiculite—which is not the same as asbestos but often has traces of it.
THERE’S A SOLUTION
There are several solutions to get rid of this unsightly ceiling and imperfections! All you need is a ladder, a spray bottle/mister, a handy scraper, face coverings, a drop cloth, and patience.
Before you start scraping, consider the age of your home and factor in the possibility of the popcorn containing asbestos. The Clean Air Act of 1970 banned spray asbestos, so if the home was built prior to 1980 it is advisable to have it tested before beginning this project.
The key is to dampen the popcorn as much as possible and work in sections. This will allow the “popcorn” clumps to fall to the ground instead of creating a chalky cloud of mess.
Once all the popcorn is removed, sand out the imperfections and apply a light skim coat to smooth it all out and then paint! Smoothing out the ceiling will give the room a more finished look that showcases the simplicity of the structure and the intricate details. Also, it makes the lighting “pop” while also giving the potential buyer the creative freedom to make the house their home. That’s what it’s all about!


